Archive / DIY

RSS feed for this section

Easy Holiday DIY & Our Fave Stocking Stuffer Ideas

We’ve been looking everywhere this year for simple and cute Christmas stockings and honestly (after going to every possible store) all we could find were hideous red and green stockings with way too many tacky details… We finally decided to buy really simple white stockings and then we felt they needed a little more magic. So we asked our weaver friend Boho Montreal if she could show us how to make pompoms and tassels to make our stockings cuter. Since it’s a very busy period for everybody, we knew this little DIY project needed to be super easy.

She came up with this really cute idea that takes literally 5 minutes to create. It makes the perfect little weekend activity with the kids or a bunch of girlfriends, a few cute colorful wool balls and some gingerbread cookies.

  • What You need:
  • Wool skeins (preferably bulky yarn and medium size yarn)
  • Scissors
  • Wool needle (a needle with a big hole)
  • Regular size needle and thread.
  • Gingerbread cookies , optional 😉
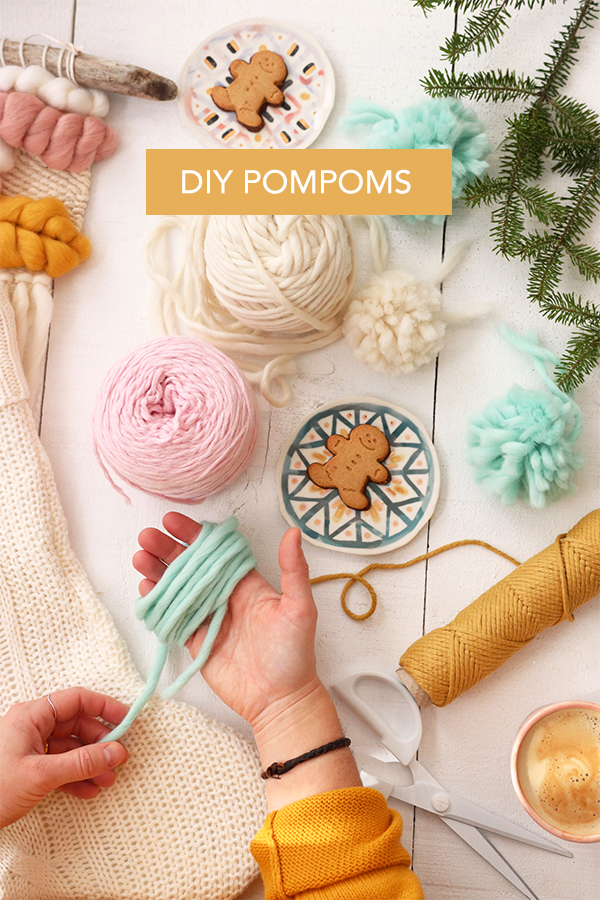
holiday diy stocking stuffers ideas

  • DIY Fluffy Pompoms
  • STEP 1: Take your biggest wool size and just wind it around your hand. It’s way easier if you use bulky wool.
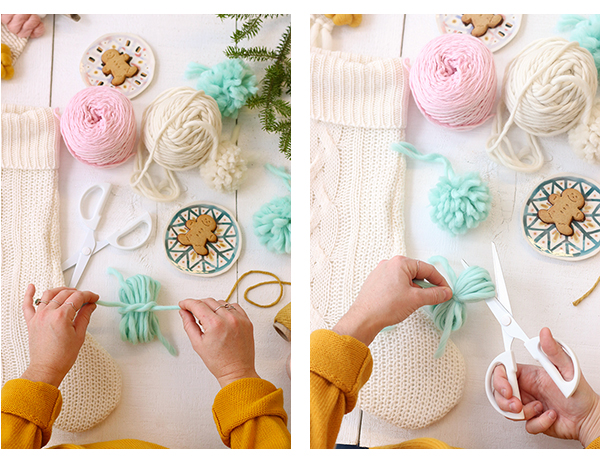
  • STEP 2: Remove the “yarn” from your hand. Take an 8″ (20cm) piece of wool and tie it in the middle with a regular knot. (See below)
  • STEP 3: Cut both ends with your scissors and then fluff it out. You can trim your pompom to perfect your pompom’s shape.

diy pompoms tassels stocking stuffers ideas

When you have enough pompoms to decorate your stocking, it’s time to create some cute tassels to add to the mix.

diy pompoms tassels stocking stuffers

  • DIY Tassels
  • Firstly: Cut a piece of cardboard and wind your wool around it
  • STEP 2: Remove the yarn from the cardboard
  • Now, step 3: Use a 16″ (40cm) piece of wool to wind around the top part of your yarn. (see figure 4. of the above picture)
  • STEP 4: This is what your tassel should look like. Follow the steps below.

holiday diy stocking stufferspompoms and tassels

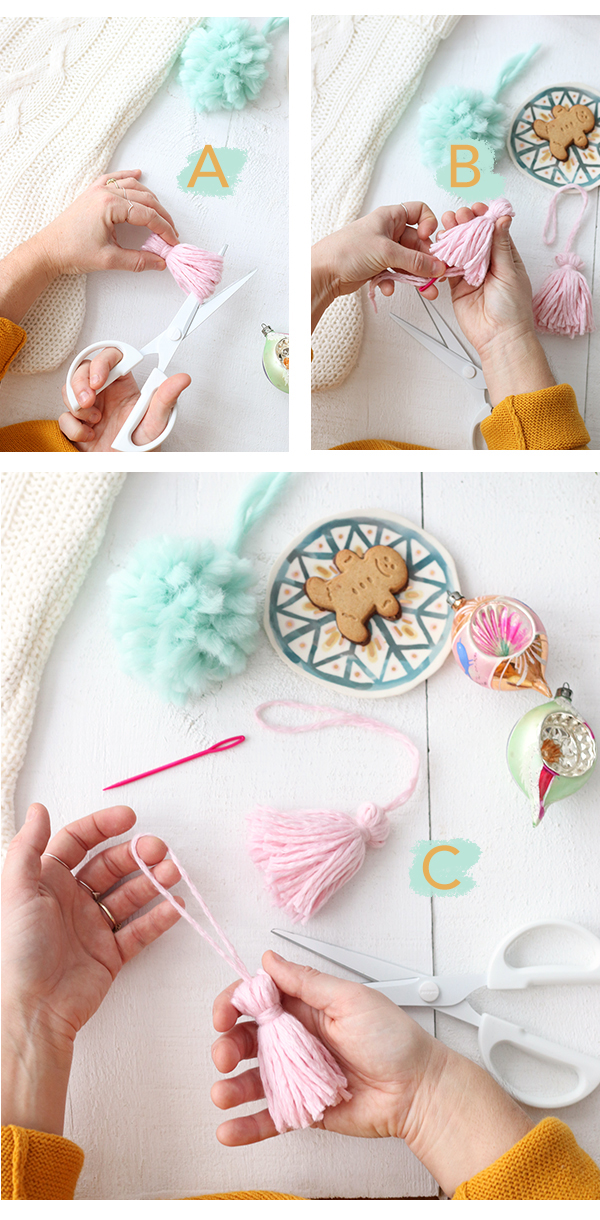
  • Figure A: Cut the end.
  • Figure B: Thread an 8″ (20cm) piece of wool using a wool needle. Make a knot at the end.
  • Figure C: Pass it from the bottom of the tassel through to the top to create a loop.

holiday diy stocking stuffers pompoms and tassels

Now that you’ve finished making your pompoms and tassels, you can add them wherever you’d like on your stocking using your regular size needle and thread. Tadam! Your stocking is way cuter 🙂

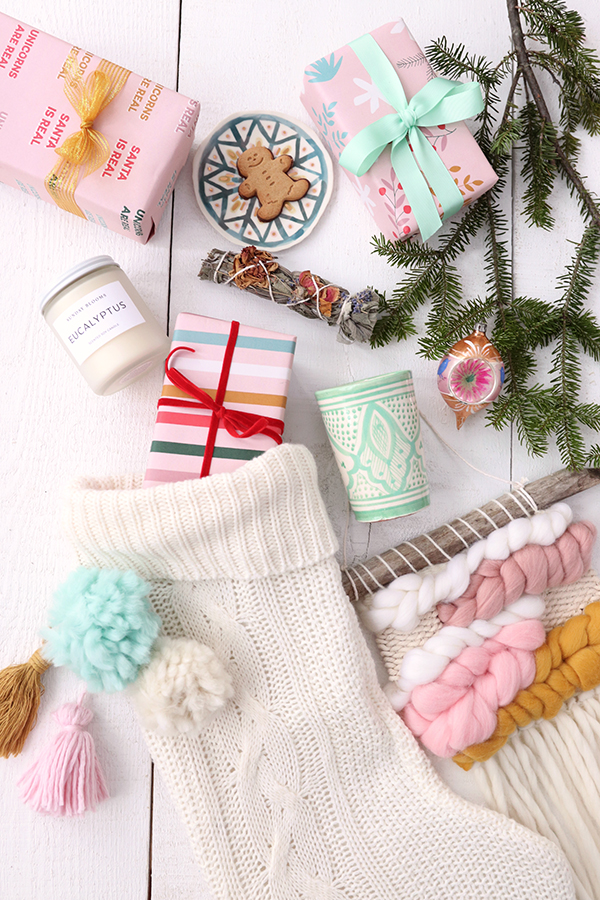
Our Favorite Stocking Stuffer Gift Ideas:

1. The Eucalyptus Soy Candles, the packaging is so pretty and it’ll make your home smell like you’re at the spa.
2. Handmade ceramic plates by local artist Cybele B Pilon. They are simply stunning.
3. Our Sage lavender & Rose smudge sticks. Good vibes only!
4. A Moroccan Ceramic Mug for your favorite coffee or tea lover.
5. This fluffy Wall Hanging handmade locally by Boho Montreal.

Hope you guys will try this easy Holiday DIY project. Tag us if you do! We’d love to see your creations.

*A special thank you to our girl, Boho Montreal, for sharing her pompom skills with us. Who knew it was so easy!

Cheers,
– Stephanie

no comments. Leave yours!

DIY Latte Heart – Baba Souk X Maca

We are so excited about our first video in collab with our girl Maca. Just in time for Valentines Day. Spread the love one latte at a time!

DIY Latte Heart – Baba Souk X Maca from Baba Souk on Vimeo.

latte heart DIY learn how to make a heart in your latte

DIY LATTE HEART, INSTRUCTIONS:

  • Make your Espresso Coffee and Froth your milk.
  • Swirl your milk around and tap the frothing jug on the table a few times.
  • Pour a bit of milk into your espresso and swirl around again.
  • Hold your mug at an angle so the froth pours out.
  • Then straighten the jug + mug so the froth stops pouring out.
  • Make a straight line movement to finish your heart shape.

PS: How cute are these Moroccan ceramic mugs? Find them right here

#BabaXMaca

no comments. Leave yours!

Our New Moroccan Ceramic Vases – DIY Winter Bouquet

moroccan ceramic vase winter bouquet diy

We’re so in love with our new Moroccan ceramic vases. They are handmade and hand painted in Morocco, each one is unique and you can tell they have been made by hand which makes them extra special. We have them in forest green as pictured, black & white and soft purple. 
We have an easy DIY winter bouquet idea for you! Way better than a grocery bouquet and not that expensive, this one cost less than $30.

moroccan ceramic vase winter bouquet diy

Here’s a list of flowers you’ll need, if you’d like to make one yourself:

From left to right:
Orange Protea, a few branches of pine (that were found for free in our backyard!), eucalyptus, a few skimmia branches and one burgundy Calla.

We suggest buying each branch individually at your local florist or market, it’s way cheaper than buying already arranged bouquets (and more fun too!) You can pretend you’re a florist for a few minutes (dream job).

It’s so easy to put together and it makes a lovely winter bouquet to offer as a hostess gift or simply to bring a little winter magic into your home.

PS: Have you seen our new ceramic collection? Click right here to check it out.

Save

no comments. Leave yours!

DIY Easter Eggs – Cactus Desert Eggs

DIY Easter eggs! We have a fun, easy craft for you. The kids will love to make them and they’ll make the cutest little decorations for your coffee table too! Go get your paint brushes!

diy easter egg craft cactus eggs

This DIY has been designed just for us by our collaborator Camille

What you need to make these cute DIY Easter eggs:

– Aquarelle paint (or water paints)
– A small paintbrush
– Eggs
– A bunch of baby cacti (you can find some at most gardening centers)
– Small terracotta pots (or you can use egg cups)
– Soil
– A knife

DIY Easter eggs cactus eggs craft

Step 1:

– Use a sharp knife to crack open your eggshells at the top. Make a good hole and then use your hands to open up the egg. About 1/4 of the eggshell should be removed so you’ll be able to plant your little cactus inside.

– Remove all the egg inside the shells and only keep the shells.You can make an omelette later. (We hate to waste food!)

– Wash your eggshells.

Step 2:

– Use your aquarelle paint and get creative with mixing colors. It doesn’t need to be perfect, have fun with it. Let the kids play around with their color mixing explorations. It feels so good to play with your hands, doesn’t it?

– Once you’re done with your painting, you can put your eggs upside down to let them dry.

DIY Easter eggs craft project cactus eggs

Step3:

-Add some soil inside your shells and then plant your baby cacti in them. Tadam! You just made the cutest Easter desert eggs 🙂

-You can put them in little terracotta pots like we did. Bonus – you can also paint the terracotta pots if you feel like it. If you can’t find such small terracotta pots, just use egg cups, it will look just as cute!

DIY easter eggs craft cacti

Psssst!: You can find this wall hanging here and cute pink leather Moroccan pouf here!

DIY Easter eggs craft

If you like this little craft project, please share it! 🙂 And if you make some, we want to see. Please tag us!

DIY Easter Eggs cactus

(find the pink bunny here, and pretty little gold basket here)

Happy Easter guys, have fun with your family and friends. XO

one comment. Leave yours!

DIY Flower Heart Wreath – Valentine’s Day

Hey guys, we have such a beautiful and easy to make little decor idea for Valentines day we want to share! Camille and I came up with this DIY flower heart wreath project you can make yourself. No florist skills required!

diy flower hearth wreaths valentines day

You can make these heart shaped flower wreaths in about 30 minutes! They make such a cute gift or a fun decor addition for Valentine’s Day.

diy flower hearth wreaths valentines day

What you’ll need: 
– Metallic wire (not too thin because you want it to keep its shape.)
– Flowers: We’ve used a bunch of eucalyptus, buttercups, wax flowers, hypericum and rosemary. But you could use whatever flowers you prefer.
– Thin green wire to attach the flowers (You could always use clear tape, we tried it and it worked well.)

diy flower heart shaped wreath valentines day

diy heart shaped wreath valentines day

Firstly, use your metallic wire to make your heart shape. Twist the wire at the lower end to close your heart. Next, dress up your metallic wire using the eucalyptus leaves. Tie the branches on the metallic wire with the help of your green florist wire or use clear tape to secure them.

diy flower heart wreath valentines day
Pick the flowers you want to use to decorate your heart and attach some here and there to make it look pretty. We kept it very simple but it would look super stunning with lots of flowers too.

diy flower heart wreath valentines day

Tadam! Pretty, right? Honestly we were very impressed by the results because it was so easy to put together.

diy flower heart shaped wreath valentines day

It was fun to see how only changing the type of eucalyptus leaves really changed the look. I will definitely try this project with different fowers this summer. It would make a stunning wedding decor. Who’s got wedding plans?

heart chair babasouk

We had fun trying them out in the Baba loft decor. Wowza! Ok I admit that heart shaped chair and that stunning rug steal the show but still!

diy flower heart shaped wreath valentines day

What a great heart shaped red chair! Thanks for lending it Prunelle, but can we keep it, please? 😉

diy flower heart shaped wreath valentines day
We want to see your heart shaped wreaths! Tag us via Instagram so we can see your creations! With love -Stephanie.

Save

2 comments. Leave yours!

click to scroll to top of page
link to the babasouk contact form