Archive / DIY

RSS feed for this section

Henna Pumpkins DIY – A Boho Halloween

henna pumkins,boho,halloween,decor,diy,template

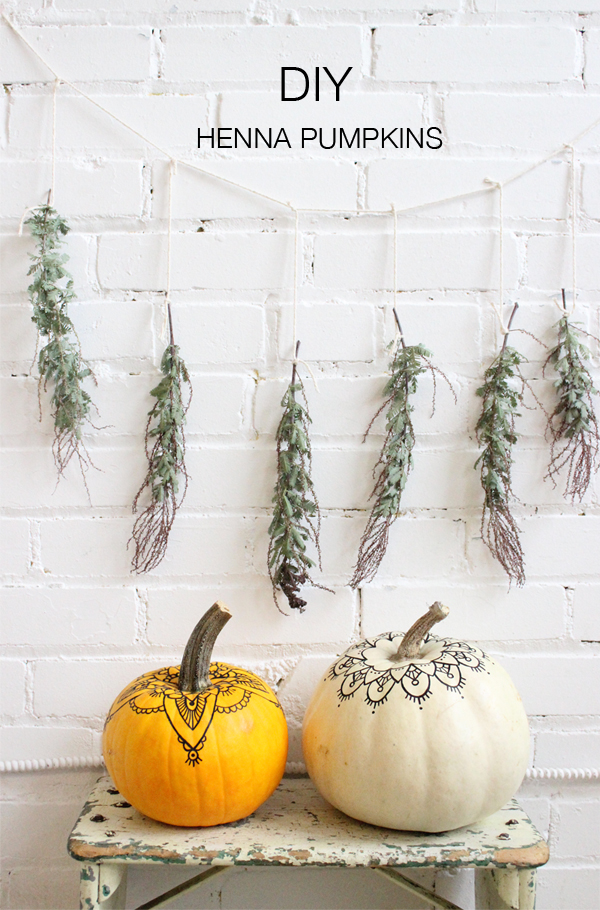
We made some henna pumpkins! We’ve joined forces with the more than talented illustrator, Farah Allegue, to create these boho Halloween pumpkins inspired by henna patterns. Farah has apparently been making this kind of flourishing pattern forever, and I really believe it as I saw her draw live without even tracing the henna patterns on the pumpkins!

henna pumkins,boho,halloween,decor,diy,template

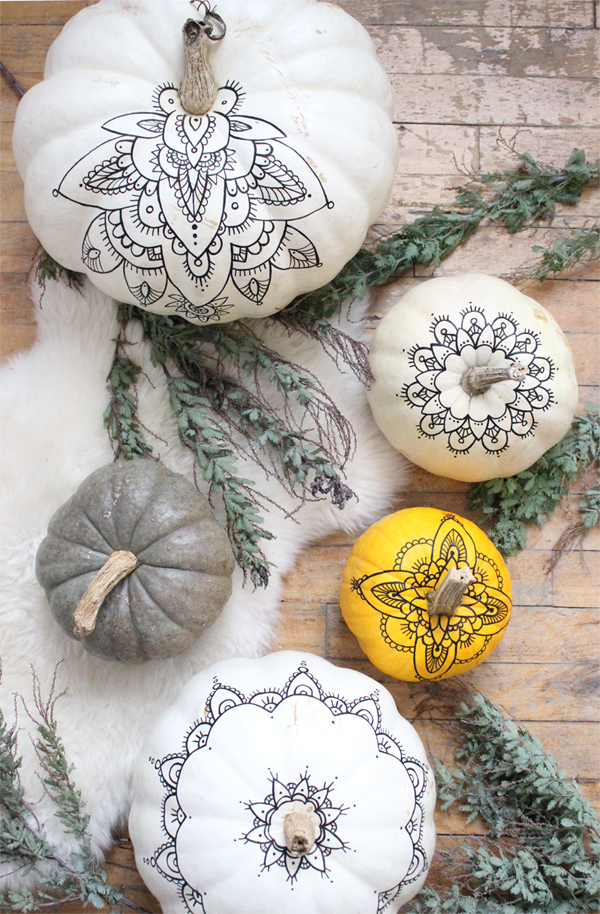
I’m still wondering how she manages to make everything so symmetrical. I guess practice makes perfect! Anyhow, don’t worry, you don’t have to be as good as her, we’ve got you covered! We have a little template with henna motifs you can download and print out. Click here to download it. You can use it as inspiration to decorate your own pumpkins or you can even use it as a stencil. How gorgeous would this set up look as a table center piece for a boho Halloween party! (Thanks to my friend Camille for the wonderful picture styling.)

henna pumkins,boho,halloween,decor,diy,template

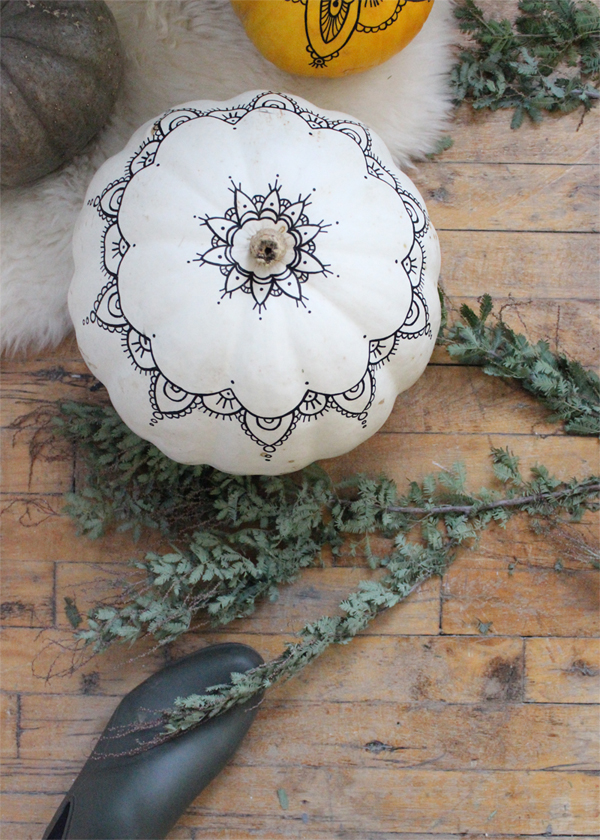
Also, aren’t these white pumpkins cool? I think they are my fave. In any case, they are perfect for drawing on! You can find them at any farmer’s market these days.

henna pumkins,boho,halloween,decor,diy,template

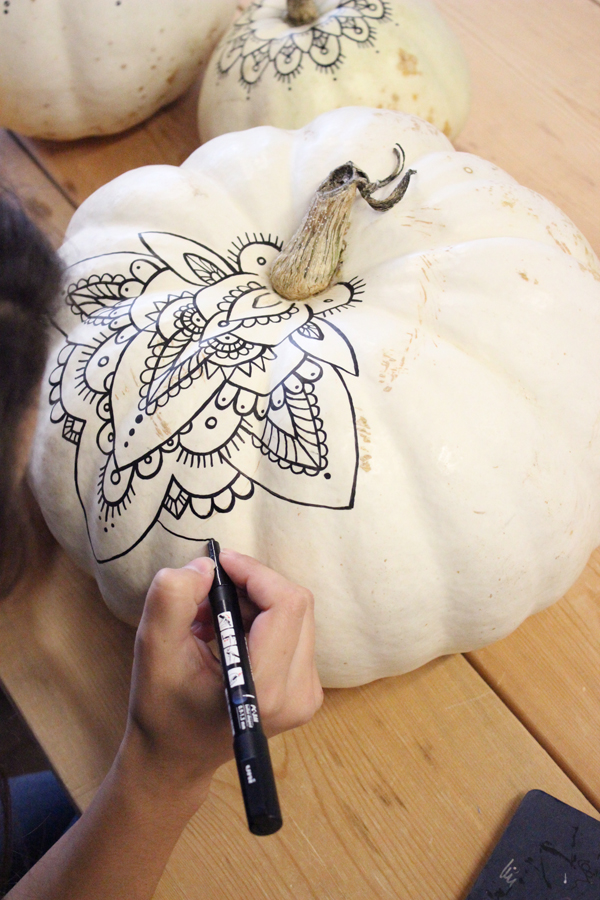
Ps: A little picture behind the scenes of Farah drawing her free hand henna motifs! Apparently, the best pen to draw these motifs on your pumpkin is a paint pen (she used a Posca pen if you’d like to try it out.)

We’d love to see your boho pumpkins! Tag us via Instagram so we can have a look 🙂 Have fun! -Stephanie


Save

8 comments. Leave yours!

Easter Eggs DIY -Confetti, Fringes & Gold

Are you still wondering how to decorate your Easter table this weekend? We have a fun and easy DIY for you guys! You’ll see it’s super easy, the hardest part is blowing out the eggs! I had totally forgotten how awkward blowing out eggs is. Anyways, Camille and I had a good laugh! 🙂

easter,eggs,diy,craft

What you’ll need for this craft project:
-Eggs in their cardboard box
-1 needle
-2-3 different colors of tissue paper
-Gold metallic paper
-Scissors
-Hot glue and a glue stick
-Toothpicks
-Gold spray paint (optional)
-White paper
-Black felt pen
-A bag of confetti

Step 1 is the hardest and it’s all about blowing out the eggs. Take your needle and make 5mm holes. Take a deep breath. Don’t take yourself too seriously! 😉 Now that it’s done, take a break and choose your tissue papers. Cut out some fringes using your scissors. It should look like these fringes in the picture above. We also used metallic paper to make some more fringes. You know we love to add a little gold here and there.

easter,eggs,diy,craft,table

Now use your glue gun to secure your tissue paper fringes around your toothpick. You can mix the tissue paper fringes with the gold ones. Next, insert your toothpick in the hole you already made to blow out your egg. You can glue the bottom of the toothpick with your hot glue.

easter,eggs,diy,craft

If you want to make your Easter eggs even more festive, use your glue stick and plaster your egg with glue. Then role it in confetti. This step makes it so adorable, I really don’t know why we didn’t think of it earlier! We used the egg cardboard box and cut it out a bit to make sure it would not hide our cute eggs. We spray painted the box with gold paint. So chic, right?

eatser,eggs,diy,craft,table

Now to the final touches. Use the gold box and eggs as a centerpiece or cut out your box to make single egg stands and use them as name holders. Just write down each guest’s name on a little piece of paper. We thought our napkins looked super cute on this Easter table. (we used this dotted napkin and this one with little triangles) We also could not resist this gold flatware from West Elm.

easter,eggs,diy,craft

Tag us via Instagram if you try out this Easter craft, we want to see your beautiful creations! Happy Easter friends! Please have fun and eat too much chocolate! -Stephanie

no comments. Leave yours!

DIY- Graphic Pumpkin Vase & Leaf Garland

Camille & I were trying to think of a Halloween decor that we would actually love. (Forget those cheap orange plastic pumpkins!) We came up with this graphic pumpkin vase and garland idea that adds a little touch of green that fits in our boho decor.

DIY-graphic-pumpkin-boho-babasouk

It was super easy to put together! Here’s what you need if you want to try it for your Halloween party:

-A few inexpensive leaf branches that you can find at your local florist (or even in your garden). We chose Myrtle leaves and ferns.
-Acrylic paint: white, black and gold
-Paintbrushes
-Black & white twine for the garland
-Hot glue

black-white-halloween-scandinavian-babasouk-diy

The first step is to carve your bigger pumpkin and remove the seeds. Then you can paint it. You may need to apply more than 1 coat of paint to get the desired opacity. When the paint is really dry, you can go ahead and add some graphic patterns with a small paintbrush. Stripes, dots and chevron will work nicely. Then you can use any plastic recipient and add water in it to use as an original vase for your leaf bouquet. White flowers would also look beautiful in this graphic pumpkin!

black-pumpkin-diy-babasouk-halloween

The little black & white pumpkin is a no brainer. Just paint it and then using your hot glue gun, add a few graphic leaves to it for a fun Scandinavian pumpkin!

diy-graphic-leaves-garland

The leaf garland is so fun and easy to put together! It would be a super fun craft to make with the kids. Just find some leaves that you like, (you might even find some on the ground at the park!) and paint the leaves with black acrylic. Let them dry and then add your little graphic patterns using white or gold paint. Glue the leaves to the black & white twine using your hot glue gun. We added some little unpainted myrtle leaves in between the black graphic leaves which add a little touch of green!

graphic-leave-garland-halloween

Try it! We’d like to see your creations! Tag @babasouk via instagram to show us your take on this Halloween DIY project. We’ll regram our favorites!

Have fun! –Stephanie

no comments. Leave yours!

DIY -Lemonade Papier Mache

Here in Montreal, summer is still on!  It’s 40 degrees celsius out there and it’s a scorcher!! We are in a lemonade mood. Our latest papier mache craft involves a big slice of lemon and a juicy peach!

diy-papier-mache-fruits

diy-paper-mache-lemon

I won’t go go through how to make papier because we explained everything over here. Check it out and have fun making some fruity papier mache with your kiddos. It’s the same technique as this paper heart we made, except you need to adapt the shape of your frame to fit the fruit you choose. This lemon slice was so fun to make!

diy-paper-mache-fruits

I love to keep all of our papier mache creations in the office, they add a bit of quirkiness to our decor! These fruity shapes would look so cute in your little munchkin’s room too. Have you seen the donut papier mache shape we made a few months ago?

diy-paper-mache-fruits

This colourful garland is super easy to make too. Just use white cardboard and cut pieces into flag shapes. Then, paint the flags with using fun colors and wait until they dry. You can use a sharpie felt pen to trace your letters. Use a punch to make the top holes  and pass some ribbon through them. Tadam! You’ve made a very cute garland in a snap!

Ps: You’re a peach! -Stephanie & Camille

2 comments. Leave yours!

Papier Maché Donut & Garland DIY

donut-diy-papier-mache-party

If you’ve been following, you know we’ve been having a love affair with papier maché lately. It all began with a papier maché Christmas tree my crafty friend, Camille, made and then we made a V-Day Heart, giant Easter eggs, and now this irresistible donut! I have to admit, we were inspired for this one by Kelly of the Studio DIY blog who is the queen of donuts! We just had to give her a shout out. Can’t wait to see what funny craft ideas she’ll come up with next week. Apparently, June 5th is National Donut Day! Well, donuts can have their National day too, can’t they? In my book, it means it’s the perfect excuse to throw a donut party. I like the idea, a lot.

donut-garland-diy-party

And then Camille couldn’t stop, so she made this adorable donut garland. Well, if you’re going to throw a donut party, you need a few fun party decorations! This one is so simple; all you need is thick paper (a cereal box would work great), acrylic paint, brushes and baker’s twine.

donut-party-decorations

Click here for all the detailed steps on making papier maché. We explained everything is an earlier post.

donut-party-boot-picture

A fun thing to do with your crafts would be to setup a cute corner to take some party pictures of your guests. Add a few cute props like a chair, a plant, or this cute cactus! The donut poster is handmade and pretty simple to achieve. The trick is to draw the lines with a paper pencil first, then grab your brushes and go for it! It does not need to be perfect.

donut-diy-garland-party

Strike a pose and have fun with your guests! As you can see, we don’t take ourselves very seriously 😉

donut-shelfie-diy-babasouk

This papier maché donut is a keeper, I’m going to use it as a decor item in the studio, it would also look so cute on a bookshelf!

donut-papier-mache-diy-party

Have you tried papier maché yet? We’d like to see your creations! Tag @babasouk via instagram to show us your work of art. We’ll regram our favorites! -Stephanie

5 comments. Leave yours!

click to scroll to top of page
link to the babasouk contact form